I understand your reluctance to export and post you camera setting. You could clone the camera nad settings, then in the clone remove your camera ID & password. Export that camera only (NOT the BI settings) & post. In this way no ID/Password is exported. I/we could import that into a clone of a camera and test.
Without this, or at lease screenshots of every Motion Sensor tab, we can only guess and provide 'Try This' help.
Where and what type of drive are you recording too? C: D: ? Hard drive, SSD ?
If your looking for objects passing thru the door, either from outside or inside...
- Select 'High Definition. This will increase motion sensor samples by 4 times, giving you better control. Note that this will also increase cpu\gpu usage a little bit for this camera.
- Deselect 'Object crosses zones', as this is the only zone you have. By default, BI will use all zones defined.
- Increase the height of Zone A along the wall almost up the ceiling. And, increase the width of Zone A in an arc out from the door into the right side of the lobby. You may not want to cover the window/shade and floor area in front of it, so that shadows will not trigger.
This will give BI more time to detect motion, and as a result, you will get the triggers starting earlier as they leave.
- 'Make time' and 'Object Travels' work together to adjust when the motion triggers. That is how much of a delay do you want? Larger values will delay, smaller values will delay less, and 0 will trigger immediately.
For example, if you make a 'Make time' of .5 and an 'Object travel ' of 80, the object must last for 1/2 second AND that object must last and move for 80 pixels.
A few notes:
- Object detection... When an object is detected and the sensitivity is not sensitive enough, the object box may disappear, then reappear. When this happens the detection will start over, needing to meet the motion sensor settings again. This may be what's happening. Difficult to know.
- You have 'Max trigger' set to the default of 60 seconds. If you set this to '99999' (5-9's), the detection will last as long as there is motion.
- Not a solution, but... Since you have recoding set to 'Continuous', you can always go back manually to get the missing motion when viewing the clip to export.
Alert Question
Re: Alert Question
Sorry for another reply...
As long as you have the camera recording 'Continuously', you can change the motion settings, then double click one of the clips that didn't work correctly, OR, go into the timeline to a missed event, right-click and select ''Testing and tuning', then ' Analyze with motion detection' and play the missed clip. This will test the new new settings. Change them slightly and retry... rinse... repeat.
This used slightly more cpu/gpu, so remember to turn this off when finished testing.
Export the settings first, so that you can restore them back.
Another method is to clone the camera and test new settings with that, so the original (Master) camera is not effected. If you do this, make sure the original is set to 'Clone Master'. The Cloned camera will show a '*' after the name indicating it is a clone... And in the Camera list, it will show up with no bitrate. A cloned camera uses the same feed as the master, and uses minimal resources.
Re: Alert Question
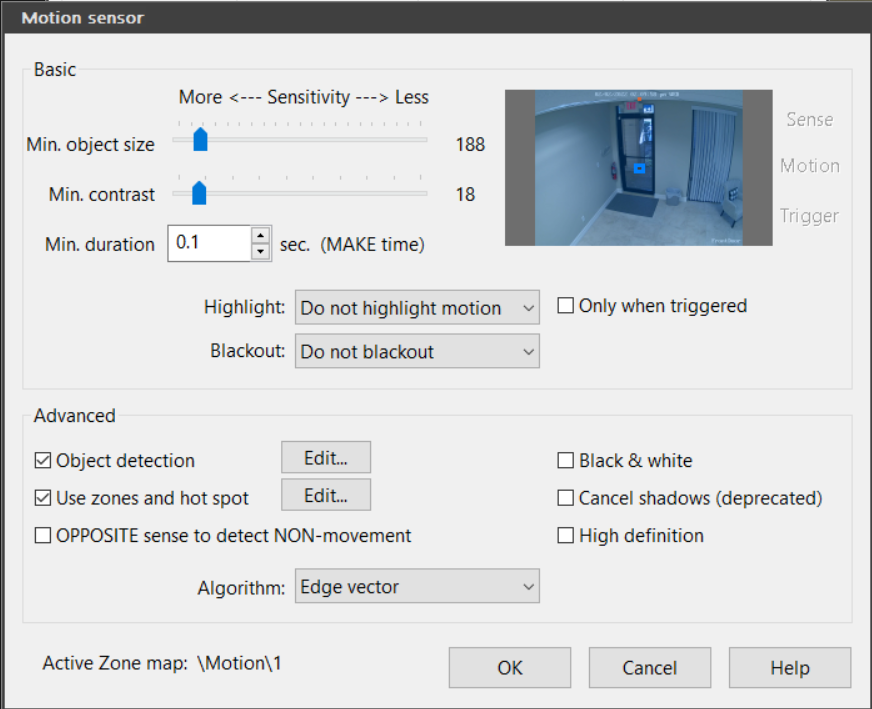
I updated the zone settings per your suggestions. I set the Make Time to 0.1. I am not using DeepStack as it seems like a different animal and I am just getting used to BI.YrbkMgr wrote: ↑Wed Feb 02, 2022 4:31 am Okay, couple of suggestions to start...
1. Make Zone A completely fill the area
2. Disable Zone Crossing
3. Post your Motion Sensor settings - the Make Time (min duration) is important - I have three cameras all at 0.2 or 0.1. You can always tweak it.
4. Are you using DeepStack?
5. When you want to review an alert clip, if you double click on it, the playback offsets for new alerts will begin at the motion-leading position rather than the beginning of the entire pre-trigger buffer. If you want to see what happened before that, just drag the slider to the left. There are multiple ways to review an alert.
6. Study the help file about continuous vs continuous + triggered vs continuous + alerts. This has an impact on what is recorded, when, and what quality is used.
7. If you filter the clips list by All Clips, you can jump to a specific time to see everything that happened (not just the alert) at that time. The image below shows playback for an Alert clip where you can move the scrubber manually or jump to a time.
I made my Motion sensor settings a lot more aggressive to see how it works:
For 5, I think I am clear on reviewing what I have recorded. I was just wondering if I could update the start time to be a little earlier - for ease of export and notifications.
Thanks for your help.
Re: Alert Question
MikeBwca wrote: ↑Wed Feb 02, 2022 1:25 pm
Where and what type of drive are you recording too? C: D: ? Hard drive, SSD ?
If your looking for objects passing thru the door, either from outside or inside...
- Select 'High Definition. This will increase motion sensor samples by 4 times, giving you better control. Note that this will also increase cpu\gpu usage a little bit for this camera.
- Deselect 'Object crosses zones', as this is the only zone you have. By default, BI will use all zones defined.
- Increase the height of Zone A along the wall almost up the ceiling. And, increase the width of Zone A in an arc out from the door into the right side of the lobby. You may not want to cover the window/shade and floor area in front of it, so that shadows will not trigger.
This will give BI more time to detect motion, and as a result, you will get the triggers starting earlier as they leave.
- 'Make time' and 'Object Travels' work together to adjust when the motion triggers. That is how much of a delay do you want? Larger values will delay, smaller values will delay less, and 0 will trigger immediately.
For example, if you make a 'Make time' of .5 and an 'Object travel ' of 80, the object must last for 1/2 second AND that object must last and move for 80 pixels.
Thanks for the suggestions. I am recording to an SSD for now. Will probably add a 4TB drive some time in the future.
I have updated my Motion settings as you suggested, and set my Make Time to 0.1 and Object Travels to 40.
Appreciate your help!
Re: Alert Question
1. Make Zone A completely fill the area
2. Disable Zone Crossing
3. Post your Motion Sensor settings - the Make Time (min duration) is important - I have three cameras all at 0.2 or 0.1. You can always tweak it.
4. Are you using DeepStack?
5. When you want to review an alert clip, if you double click on it, the playback offsets for new alerts will begin at the motion-leading position rather than the beginning of the entire pre-trigger buffer. If you want to see what happened before that, just drag the slider to the left. There are multiple ways to review an alert.
6. Study the help file about continuous vs continuous + triggered vs continuous + alerts. This has an impact on what is recorded, when, and what quality is used.
7. If you filter the clips list by All Clips, you can jump to a specific time to see everything that happened (not just the alert) at that time. The image below shows playback for an Alert clip where you can move the scrubber manually or jump to a time.